
There are many blogs and resources you can learn how to prepare and scan your slide collection, but when faced with the sometimes-daunting task of sorting your 35mm slides prior to digitizing, there’s not much direction.
I found this out after I met my client, Beverly. Having recently downsized from a big home to a one bedroom condominium, she had several large boxes full to the brim with 35mm slides. Beverly had no idea where to start which is common with slide collections, as they are not as easily viewable like print photos.
We sat down to discuss the collection to find clues as to how we should go about sorting them in the most meaningful and expeditious way possible. The boxes were housing both her father’s very prolific compilation and her late husband’s as well, dating from the 1940s through to 1990 and numbering roughly 3,000 to 4,000 35mm slides. With any vast photo collection that travels around with families, changing homes, picked through for celebration slide shows and searched for beloved images, the chances are they will be disturbed chronologically. Beverly’s collection was no different. Sadly the two men who lovingly chronicled their family’s stories on film were no longer here to help.
Beverly asked if we could sort them chronologically because she intends to pass on the family photo history to her children and grandchildren. We knew it would be a challenge but were determined to create a plan to tell these stories as they unfolded in the family’s lives. Like reading a book from start to finish, beginning with Chapter One.
With the project now complete I can tell you there were some surprises such as more boxes full of slides found hiding in the condo locker halfway through the project. With organizing projects always expect the unexpected!
Here is what I learned about sorting decades of 35mm slides chronologically.
HUNT AND GATHER
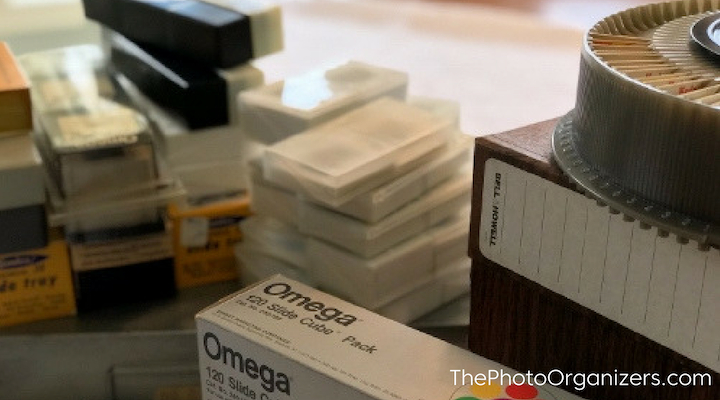
Be sure to find all the slides, slide trays, old projector carousels first. These can be anywhere, as in Beverly’s project when she discovered more slides in her locker in an identified carton. It felt like a setback for us as we had made good headway and were feeling quite accomplished. It certainly wasn’t unmanageable, but it’s just easier to avoid the road bump if possible.
Search all usual suspected closets and drawers and ask your family if they are harboring any slides snuck away for their own purposes many moons ago. Once you have found everything, bring it together in a comfortable workspace with good light and a table covered for the slides’ (and the table’s) protection. Now you are ready to begin.
REVIEW AND LABEL
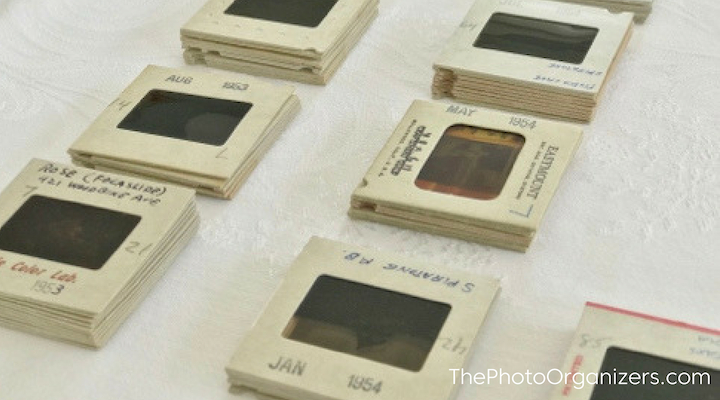
Determine what each slide tray may contain in terms of processing dates. This is the date stamped on the mount of the slide. It’s important to note that this date stamp is not the date the photograph was taken. It is the date the film was developed.
I’m not suggesting you go through each slide, instead do a random check every 10-20 slides. Label each tray with the years inside. Believe me, this pays off all through the project, especially if you have thousands of slides. Note the years in each tray on the cover with a label – not a sticky note – I guarantee the sticky note will go astray. Once they are all labeled, physically sort the trays chronologically where possible, mixed and assorted years should be inserted accordingly, or placed at the end of the order. We kept them in larger cartons by decade for easy retrieval during the project. If you keep them in cartons, note on the outside which trays it contains.
SORT AND EDIT
Starting with the first year create piles of slides by processing date. This is usually the month and year only. If you are lucky enough to have slides with handwritten information about the specific day/month/year, keep those piles separate as the information is even more specific.
When you have the entire tray separated into piles by month, you can then view the slides to break it down even further by places and events. For example, in one month there may be a birthday celebration where it is evident the event is happening in one place on one day where everyone is wearing the same clothes. Events such as these will help you determine the chronology in the month as well, if you know the person’s birthdate or if it’s Christmas or Halloween. We used a Pana-Vue Automatic Slide Viewer to review slides quickly.
While you are viewing the 35mm slides, edit as you go. When I say edit, I mean to remove slides that you don’t want or need in the collection. This will cut down on the expense or effort involved in digitizing them later. Return the slides to the tray in chronological order starting at slot number one. Change the label on the tray if necessary. It’s important to keep track of the chronology otherwise you can get lost. Note: as you edit, keep empty slide trays as you may need them at the final step.
IDENTIFY AND RECORD
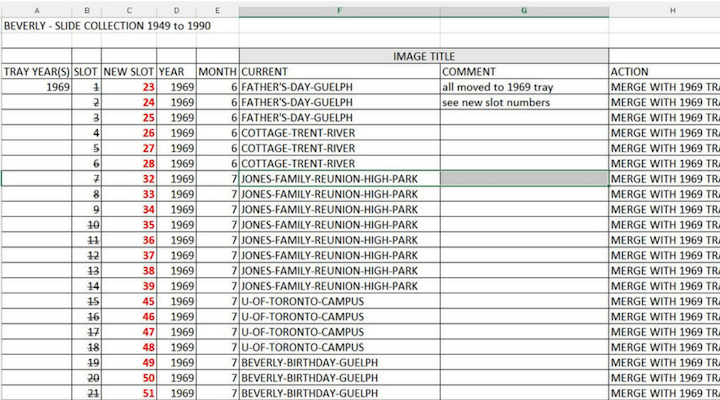
Before moving on to the next tray identify the slides and record them by slot number, either handwritten in a notebook or in a digital spreadsheet. Start with the slot number, year then month. A description is helpful for future generations, not too detailed though, such as Makinson Family Thanksgiving Collingwood. This will help keep you organized while scanning and naming your slides once digitized as well as compiling in the next and final step.
COMPILE
Once you have applied this process to all the trays, you may find that you have multiple trays with the same year. You will need to use the empty trays you have saved to help compile the trays into one continuous chronology. It will involve moving slides around so you can insert from the other trays appropriately. Use your records to help you do this and note the new slot number for the re-inserted slides. This is very important to note the changed slots as this is the only way until digitizing that you know what is what and where.
Once you have compiled all the trays chronologically, you are ready to scan. There are plenty of resources to learn all about that.
Certainly, this is a project you can do on your own, but after working side by side with Beverly once or twice a month over the course of a year, I found that two heads are definitely better than one (no surprise). There was also one other unexpected reward. I did the sorting and recording while Beverly did all the editing. During that journey, we shared stories that were evoked by her family’s images that created a deep connection between us. I now call Beverly my friend. If you have family or friends who would like to help with this endeavor, I certainly recommend it.
 Founder of Snap Shot Solutions, Daina Makinson is a Professional Photo Organizer, specializing in digital and print organizing. For the past six years, she’s helped clients organize, preserve and protect their most precious memories with their photograph collection. Daina works one on one with clients to help them with the overwhelming task of bringing all their photos together, organizing them by the people, places, and events of their lives.
Daina is a certified member of the Association of Personal Photo Organizers and has appeared on CHCH and Global Televisions morning shows, CBC’s prime time show Doc Zone, as well as the Guelph Mercury and Globe and Mail.
What a helpful and encouraging post. I too have inherited about 5000 of my father-in-law’s slides in addition to our own vast collection. One lucky thing is that most are in metal slide boxes with notes on the tray map that identify them. And many are labeled. Your process and spreadsheet may be the missing link that will allow me to start this overwhelming endeavor. Thank you.
Lynn, I’m so glad that this will help you get started on your project. Those notes are really going to help! Good luck on your journey and enjoy the moments along the way.
Thank you to APPO and The Photo Orgnizers for sharing this journey. If you come across the unexpected when sorting your slides please post your questions here and I will do my best to help!
This is super helpful Daina. I went thru a much smaller number of slides for a personal family project and wondered what the best practices would look like for a few thousand slides. Now I know -thank you!
You’re welcome Marci! Smaller projects are certainly more manageable. I’m glad I was able to put the large one into perspective for you. All the best!